Table of Contents
Receipt an Invoice
The final stage in the lifecycle of a job is the entry of a payment. There are 3 ways that a payment can be applied to an invoice in TSM. The payment can be entered on an invoice-by-invoice basis, in bulk or as a prepayment. Note that each way allows both overpayment and underpayment of the invoice total.
Receipting a single Invoice
- [
 ] Open the Job card the invoice belongs to. Remember that you can use the quick search to locate the job quickly.<
 - Go to the Invoices tab.<
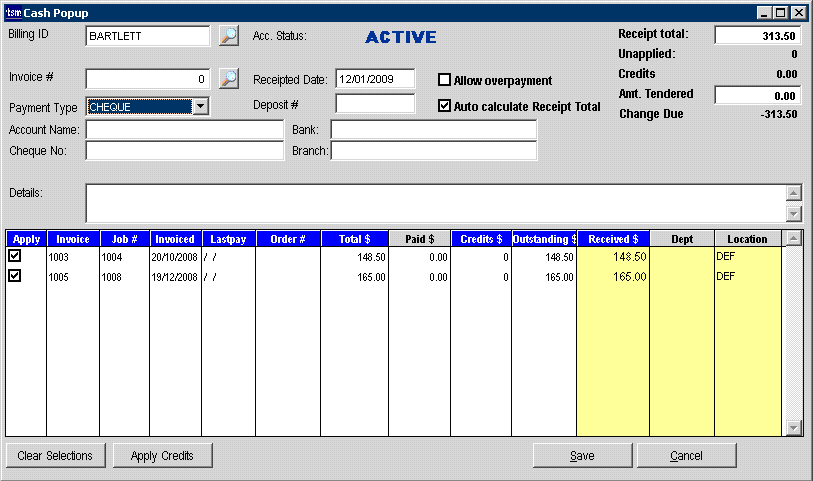
- Press the button “4. Receipts”. If it is not active, this means that the invoice has not been created. Otherwise the Cash Popup screen will appear.<
- Tick the box in the “Apply” column in the middle left. The field “Received” will be populated automatically with the outstanding amount on the invoice.<
- If the amount paid is different, put the cursor in the Received filed and correct the figure.<
- Enter the Payment type and any reference details associated with the payment.<
- Press Save. You will be taken to the Cash Receipts screen which displays all payments for this customer’s Billing ID.<
This concludes the simplest workflow for entering a cash receipt in TSM.
Receipting multiple Invoices
A customer may choose to pay several invoices at a time. Note that this method can be used to enter payment on account basis, however the individual invoices still have to have amounts applied against them for them to become redeemed and disappear from TSM’s statement report. Invoices can be paid in bulk for one Billing ID at a time only.
- Go to Action menu → Cash Receipts. The Cash Receipts screen will appear. This module can be used to review existing receipts. There are several filtering options available.<
- Use the Search buttons to bring up a list of outstanding invoices for the given Billing ID. A list of invoices will appear in the grid in the lower half of the module.
Note: Only unpaid invoices will be displayed in the Cash Popup screen.<
- Tick the invoices you want the payment applied against. If the Auto-calculate receipt total tickbox is on, the Received amounts will be automatically set to the invoices’ outstanding amounts.<
- If the amount being receipted is different from the invoices’ outstanding amount – change them by placing a curtsor into the Received columnt for the invoice and typing in the correct amount. You will need to tick the “Allow Overpayment” tickbox if the amount received is greater than the amount outstanding. This will create a credit for the customer.<
- Enter the Payment type and any reference details associated with the payment.<
- Enter the receipt total in the top right-hand of the screen, or tick the “Auto-calculate receipt total” to populate it with a value. You will notice that the Save button now appears active.<
- Press Save. You will be taken to the Cash Receipts screen which displays all payments for this customer’s Billing ID.<

